A Rifleman should have a working knowledge of bullet drop and range estimation, regardless of his weapon or his lack of a bullet compensating drop reticule. The ability to roughly estimate distance and get a proper holdover is an easy to learn skill. One of my favorite methods for quickly managing holdovers is a method I call the Chest, Head, and Hat hold. I used this method first with a red dot to quickly estimate my bullet drop from 0-400 yards, but it can be used with any simple reticule. Let’s take a look at the method.
The Chest, The Head, and The Hat
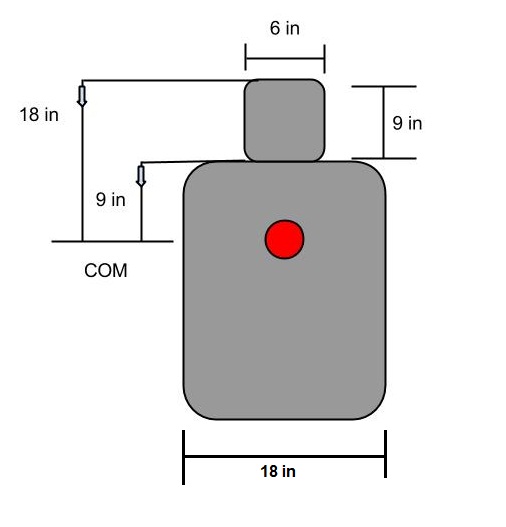
What this technique does is simple: it breaks the human target into three different zones which can be easily repeated and is used for basic, “on the fly” holdovers. Used with a 50 yard zero, this method also works with a variety of popular calibers. Lets look at our basic target:

Our silhouette is based on the average height and width of a human torso. We can see that overall from the top of the head to the waist, we have a lot of real-estate to make a hit. We are going to use our knowledge of bullet drop and play this to our advantage.
Once we start shooting past two hundred yards, we start compensating for the bullet drop. Instead of wishing you had an ACOG or a means of utilizing bullet drop… we can use built-in reference points on the human silhouette.
With a 50 yard zero:
The Chest: our typical point of aim, point of impact from 0-200 yards.
The Head: out to 300 yards we start to drop a few inches depending you choice of caliber. No biggie. A dead hold to the face will drop our round into the upper chest.
The Hat: here is our shot reference out to 400 yards. Imagine shooting a hat off your target. The hold is just a smidgen over the head. You will drop rounds into the mid to low chest depending on caliber.
More Than 5.56
What’s neat about chest, head, hat is that it works with many popular calibers and a 50 yard zero.
.243, .308, 5.56, .30-06, and .270 will work provided you stay near the popular loadings in each caliber. Here are a few calibers as example:
| Yards | 5.56 55gr | 308 147gr | 243 80gr | 30-06 147gr |
| 100 | 0.5 | 0.3 | 0.6 | 0.4 |
| 200 | -1.8 | -3.2 | -1.4 | -2.1 |
| 300 | -9.6 | -12.8 | -8.5 | -9.9 |
As you can see the drops are all different, but not so different that they wouldn’t connect to the body at those distances. Pushing your gun further requires practice and a knowledge of where to float the reticule above the target. That requires just plain ole practice… but the above method can be taught quickly. Different bullet weights will affect the bullet drops on the chart, but it is up to you to check your load to see if the shooting method is adaptable. In many cases, it will work well with a variety of bullet weights and in many popular center-fire calibers.
One load that does not work well with this system is 7.62×39 and the .30-30. They drop like rocks. These two are a no go for this method… but a hit to the knees is better than nothing I guess.
Judging Distance
The hardest part to learn is to effectively judge target distance. The easiest way is to buy a simple electronic free range finder such as this Vortex Optics Recon or Solo model. Learn to use it.
The best way is to use a variety of methods to judge range including the naked eye. Having at least two ways to judge distance on the fly will give you the best results.
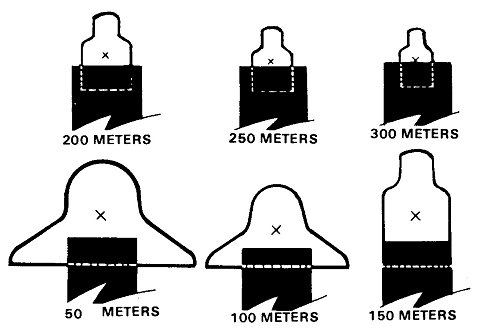
Here is an excerpt from the USMC range estimation lesson plan. It offers another method to judge distance on the fly.
Visible Detail Method. When observing a target, the amount of detail seen at various ranges gives your shooters a good indication of the target’s distance. They should study the appearance of a person when they are standing at a range of 100 meters. Your shooters should fix the persons appearance firmly in their minds, carefully noting details of size and the characteristics of uniform and equipment. Next, they should study the same person in a kneeling position and then in a prone position. By comparing the appearance of these positions at known ranges from 100 meters to 500 meters, your shooters can establish a series of mental images that will help determine range on unfamiliar terrain. They should also study the appearance of other familiar objects such as weapons and vehicles.
(1) 100 Yards. At 100 yards/meters, the target can be clearly observed in detail, and facial features can be distinguished.
(2) 200 Yards. At 200 yards/meters, the target can be clearly observed, although there is a loss of facial detail. The color of the skin and equipment is still identifiable.
(3) 300 Yards. At 300 yards/meters, the target has a clear body outline, face color usually remains accurate, but remaining details are blurred.
(4) 400 Yards. At 400 yards/meters, the body outline is clear, but remaining detail is blurred.
(5) 500 Yards. At 500 yards/meters, the body shape begins to taper at the ends. The head becomes indistinct from the shoulders.
(6) 600 Yards. At 600 yards/meters, the body appears wedge-shaped with the appearance of no head.
So learning your targets features will give a really quick rough estimate for an educated shot.
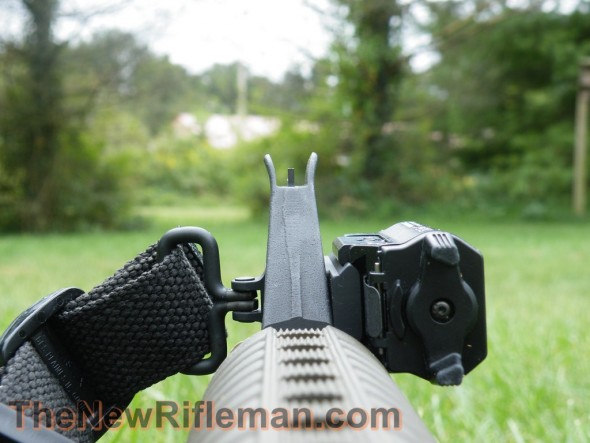
Also using the technique of estimating range with the front sight post may provide a useful backup to your other methods:

Wrapping Up:
Everyone can learn some BDC. It isn’t hard. A Rifleman should know how to shoot to reference points on targets by making educated estimates of the distance and the required hold. If your scope, red dot, or other optic method doesn’t have a BDC compensating reticule then the Chest, Head, and Hat technique can be used. Having a simple dot or reticule is no excuse for being unable to manage targets at intermediate distances.


I teach my kids “heart, head, hat” which is easier for them to remember